Saving selection lists
After making your selections on the map, you can save the map selections and list in the Results window to be used again at a later time. When saving your results, you can choose to save it as a public list so all users can view it, or you can save it as a private list so only you can view it.
NOTE: | You need to have a valid user account if you want your selection to be saved as private. |
1. With your Results window open, select the Save Selections option

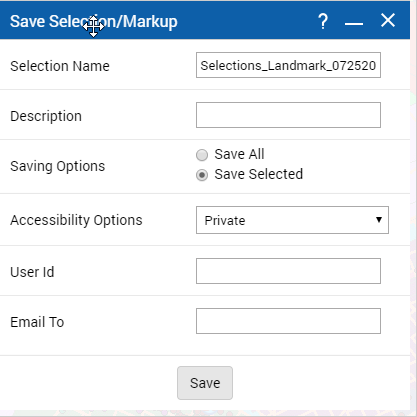
. The Save Selection/Markup window appears.
2. In the Selection Name field, you can use the default file name that is displayed, which includes the name of the feature group and the date, or you can edit the name of the selection.
NOTE: | You cannot overwrite an existing selection file unless you have logged in and saved both files as private. |
You can optionally enter a description in the Description field.
3. Select either the Save All option to save all items in the selection or the Save Selected option to save only those items with the check boxes selected.
4. In the Accessibility Options field, select either Public or Private.
• The Public option allows all individuals to view this selection while the Private option allows only you to view it.
• In the User ID field, enter the user name. This field displays if you have not logged with your user account before creating the selection.
5. (Optional) In the Email To field, type the email address of the individual you want to email this list to. This option requires that the email server is set up by the map administrator. This individual will need the User ID before they can access the selection.
• The Send credentials with E-mail check box displays only if you have logged in using your user account.
6. In Email From, specify the email address where you want the recipient of the selection (indicated in Email To) to be able to send a return email.
• Depending on how your map administrator has set up security and users for the OnPoint web-GIS application, your email address may automatically appear in the Email From field.
7. Select Save.